February 14, 2022

The other standing jewellery chest

Happy Valentine's Day! I had to share what my darling husband (DH) gave me. It is so pretty! I actually received them on Saturday. He is the sweetest guy and I'm one lucky gal!

I hope you are all well and that you get shown a little love from someone special in your life.

I mentioned the other day that I did another jewellery chest. I bought this one first and this is what it looked like when I got it:


Kind of blah, right? My youngest son's girlfriend was hanging out with me one day and she agreed to lend me some free labour. She painted the first two coats using Fusion Mineral Paint in Coal Black. I gave it a couple of light touch ups. Initially we were going to use some remnants of the transfer called Birds & Berries (the white birds) but I just couldn't figure out the best way to lay them out. 

Sooooo, I decided to use a few odds and ends from this transfer instead:


I love this transfer. I used this transfer - sort of. What I mean by that is somehow part of the transfer got stuck on the wrong side of the backing (I have no idea how that happened). This meant at least one full piece of the three was wasted. I managed to salvage some of it and used it. I had a couple of areas of flowers that I could still use, so that's what I did.

This is what the front of the jewellery chest looked like:


Not too bad! I wanted to use gold accents so I used my favourite Posh Chalk Lemon Gold pigment with the Infusor. I also knew that I needed to add something special to the sides of the chest which open to store necklaces. I have a stash of stencils and wanted to keep a French Chic vibe so I pulled out the script stencil. I used Posh Chalk Smooth Metallic Paste in Pale Gold. This is what it looks like:


I really, really need to learn to take better photographs! You get the idea though.  The drawers were in good shape. I did paint the sides of the drawers to tie them in with the rest of the cabinet.


Here are some photos of the inside:


As I mentioned in my other jewellery chest post, this one has been sold. This one went all the way to Toronto. A big shout out to my oldest son who dropped it off for me. Thanks Moose!

That's it for now. I'm nursing a wound from working on another project. More on that in the next post.

Much love to you all,

Donna


February 12, 2022

So chic!

Hello sweet friends. Thanks for popping by to take a look at my most recent project.

I picked this lovely stand-up jewellery cabinet on Facebook Marketplace last year and I had in mind to paint it some bold colours that were blended in a gradient way. Once I got started, I wasn't feeling it so decided to go down a safer path.

I thought I had a "before" photo of this but I can't find it in my files. Let's suffice to say that it was a yellowy brown colour and was b-o-r-i-n-g as heck!


Isn't she pretty now? I decided to paint her with Fusion Mineral Paint in Champlain, which I buy at Charmed & Chalked in Grimsby. I gave this 3 coats of paint. 

I wanted to give this a lovely vintage feel so added a Prima Re-design transfer called Floral Home. This has 4 different images and I cut away the frame that was around the roses and wording because it would have been too big. I'll use the frame for another project, I'm sure.


Here is a closer look at the transfer.

I also added some WoodUbend moulding (WUB 2181). I cut one set down a little for the top and the full scrolls on the bottom.  I decided not to add any Posh Chalk patina or pigment to the moulding as I didn't want to take away from the image or the gold handles, which I did paint with Lemon Gold pigment mixed with Infusor. The scrolls and luxury coatings can be found in my online Champagne Shabby shop. 


Take a look at the legs! I painted them with Posh Chalk Lemon Gold and Red Carmine mixed with Infusor to create a more rose gold colour. It's hard to tell in the photo how lovely the colour really is.

The sea shell looking appliques on the legs were existing. I added some of the rose gold patina to those initially but didn't like the way it looked so painted over them and left them. Sometimes less is more, right?


There are two little keys that came with the cabinet to lock the side compartments. I painted them with the Lemon Gold pigment. The tassels were also already attached.


The drawers were in pretty good shape. I just gave them a quick clean with my vacuum cleaner to get a wee bit of dust out of them. I love that the lid opens all the way. There is so much storage in this jewellery chest.

I have another chest that I did around the same time and I'll post that in the next couple of days. I have already sold that one but this beauty is available.

I'm working on a dresser and have changed direction on it as well! More to follow on that one shortly too. In the meantime, take care everybody and keep being awesome!

Donna

January 29, 2022

Decoupage Paper is now in!

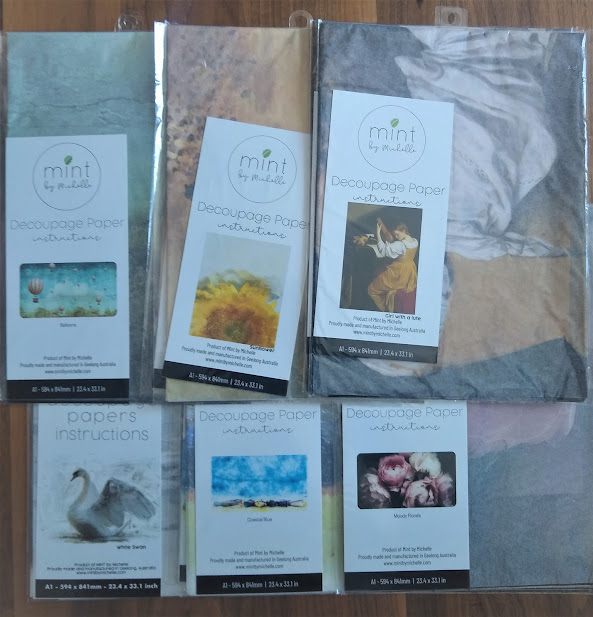
 They are here! They are here! The MINT by Michelle Decoupage Paper is here!

I was able to pick up the paper from my distributor today and let me tell you, these decoupage papers are gorgeous! I can't wait to try them out. You can check them out in my website Champagne Shabby along with the WoodUbend products that I currently stock.

These are the 11" x 17" papers (they are lightly folded in the package):

and these are the 24" x 33" papers:


There will also be a new release of Decoupage Paper coming out in March. I've seen a preview of them and I will definitely be stocking more!

Have a wonderfully creative day!

Donna

January 28, 2022

More amazing news!

Hi Everybody,

I am so excided to let you all know that I will be stocking Mint by Michelle  decor transfers and decoupage paper! It has been a dream of mine to have a store where I sell products I am passionate about. I have so much fun refinishing furniture and home decor items to add that "special something" to a space.

My order has been placed and now it is just a short wait until they are available in my online shop Champagne Shabby. I'll be sure to let you know as soon as they are. In the meantime, here are some images of furniture using the decoupage papers that I'll have available to whet your appetite:


And here are some of the rub-on decor transfers too:


I am going to have so much fun with these! 

Feel free to contact me if you have any questions about any products or how to use them. Can't wait to show you some of the projects I make with these. I will likely incorporate a bunch of WoodUBend products too!

Have a fabulous day.

Donna

January 26, 2022

Take me to the sea

I finished this project quite a while ago but never got around to posting it. I think the table was a thrift store find and it took me ages to complete as I did it in stages when the motivation hit me :) 


I started by painting the top using Fusion Mineral Pain in Casement and the legs and edge in Midnight Blue which I buy from my friends at Charmed and Chalked in Grimsby. They also stock my WoodUBend and Posh Chalk products which may also be purchased directly from me directly in my website.

I them added some spray adhesive to the back of my nautical compass stencil and let it dry for a few minutes before laying it in the centre of the table. I painted it with  Midnight Blue and a mix of Rust-Oleum Charcoal and Aged Gray. I love the contrast of the blue and gray. Here is a close-up of the top:

I had a bit of bleed through so I did lots of little touch ups with it. I still need to practice my stenciling skills, but I am sure I will be getting a lot of use out of this one. I can't remember where I bought the stencil from but I recall it was a company in the US. If I can figure it out, I'll edit my post.

I didn't change the hardware on the table. I just highlighted it with Posh Chalk Lemon Gold Pigment and Infusor to make a paint-like consistency. This dries fairly quickly and the results are gorgeous. The pigments come in many different colours. I will admit that Lemon Gold is one of my favourites.


I would love to hear what you think of this little project. I'll be listing it for sale on the website shortly.

Well, that's it for this post - short and sweet. 

Stay tuned...I should have an additional surprise announcement or two in the coming weeks. Until then, stay safe, happy and healthy!

January 19, 2022

It's official - the Champagne Shabby Website is live!

I am so excited to share the great news with you. Champagne Shabby now has a live website and it features WoodUBend decorative mouldings and Posh Chalk luxury coatings, stencils and soon we will have decoupage paper.

Hop on over to Champagne Shabby to see our current product offering. 

For those of you who are new to WoodUBend, let me explain a little about this innovative company:

WoodUbend is a small, energetic, and vibrant company situated in the North of England, with manufacturing plants in central Europe. Their sister company, Posh Chalk Interiors of Leeds, is run by Solly Jo Moore, who has a wealth of experience in crafts and up-cycling. Solly Jo is well-known worldwide through her entertaining and educational programs on Hometalk and Facebook lives.

The WoodUbend story started just over two years ago when Solly Jo came across a new manufacturing process and realized the potential for what it offered. Solly Jo brought the concept back to the United Kingdom, and starting with a small range of WoodUbend designs, and sold their first moulding at the end of October 2018. That small range has now expanded enormously, as has their client base, and they now export to many parts of the world.

There are some 3250 mould designs currently in existence, including some large and elaborate designs produced for special order. Some of the moulds used to create WoodUbend are made using the latest 3D printing technology. Backed by expert personnel both here and at the manufacturing plants, and an ever-growing number of distributors and stockists, WoodUbend offers a first-class and personal service to all of our customers.

Now, here's some additional information about the products:

WoodUbend appliques and mouldings become flexible when heat is applied and can be bent to adhere to contoured or flat surfaces using good quality wood glue. A heat gun, electric griddle, or blow dryer works great to heat WoodUbend.

WoodUbend has all the properties of wood! It can be cut, drilled, sanded, painted, stained, varnished, or distressed.

Download our free Woodubend Guide.

Posh Chalk Pigments (powder) should be mixed with a varnish to achieve a metallic-look finish or can be mixed with waxes, topcoats, and other media (water-based or oil-based) to achieve different effects.  Alternatively, you can sprinkle the pigment directly onto your project, and apply your sealing medium afterwards.

When used with a solvent-based varnish, they dry rapidly.

Posh Chalk Aqua Patinas are water-based and are ideal for highlighting surfaces. A little goes a long way, so apply sparingly and watch your project come to life with vivid colours.

They can be applied with a brush, or even with your fingers if you prefer to take a hands-on approach.

The Metallic Smooth Pastes have a wide range of uses, with many more waiting to be discovered by you.  Developed specifically to complement the WoodUbend range of mouldings, they can be used to make a surface wash, or raised stencilling (a little like thermographic inks), or applied to wall panels – again, use heat to achieve a deeper texture and greater tactility.…the applications are endless. Not only are they quick and easy to apply with a palette knife, but they bring another dimension to your workpiece.  By simply adding heat, you will see your paste jump right out at you.

Posh Chalk Textured Pastes have added grain to allow for greater texture-building in a project.  It provides further and more exaggerated textures and effects than do the Smooth Pastes. 

Applied in a similar manner to the Posh Chalk Smooth Pastes, the Textured Pastes can be used for raised stencilling, or even as a base layer to create a great texture to your piece.

Our Posh Chalk ​Stencil range​ has something for everybody.

At 250 microns thick, these stencils are durable and heat resistant; the extra thickness means they can be washed and reused time and time again.

Our stencils allow you to create amazing designs quickly and easily, without the worry of any warping or distortion when washing or drying.

Posh Chalk Deluxe Decoupage Papers are made from high-quality rice paper and are extremely durable. There are 20 designs to choose from and they are available in both A1 and A3 sizes.

Feel free to send an email to champagneshabby@gmail.com if you have any questions about any of our products. Thanks for checking us out and I look forward to helping you recreate amazing furniture and decor projects!


February 03, 2021

Console Table Makeover - From Drab to Fab!

Happy Hump Day everybody!

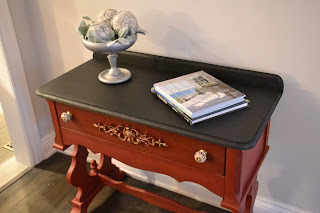
By now you know that I LOVE to buy my pieces from auction sites and thrift stores. This console table is no exception. I bought this early last summer and it was a mess, to say the least. The top was completely separated from the base of the table and was not repairable. 

I loved that it had a large drawer and the legs are fantastic! When I took a look at the underside, the legs were originally straight and the ones you see here are a new addition. Still, I loved the skirting under the drawer and I could see the potential in this.

I have limited "workshop" space (read: basement) and this was in the garage (read: husband's woodworking shop) in hubby's way. Actually, he used it to put stuff on, but it really was in the way so he decided to help me out and built a brand new top for it and brought it down to my workshop basement for me to work on. 

I scoured Pinterest for some inspiration. I love red and black together so went that route. Black for the top and a darker red for the bottom.
Here is what I ended up with:

Now, since I am now a stockist for WoodUBend Mouldings. I had to use one of the pediments on the drawer. I love Fusion Mineral Paint and here I used Coal Black on the top. See that lovely back piece on it - love that hubby took some creative license there!  I made a custom red chalk paint colour to deepen the red and applied that on the rest of the piece.
Here is a close-up of the pediment:


I used some gold guilding wax on the pediment and it really makes it pop.
I also added some clear wax all over the table and added some depth using black wax around the edges.  It's hard to see in the photos, but in real life, you can see it more. I added new knobs that I picked up at HomeSense - I like that they have these kinds of things.

I'm super happy with the way this turned out. It is available to purchase :).


I'd love to hear what you think of it!


January 09, 2021

Beautiful Bookends

 I mentioned a couple of posts ago that I was a busy girl over the holidays and I did a lot of painting. Here is another project I worked on. I picked these bookends at the Value Village close to my home (I love that place!) and turned them from dark brown (read boring) to shabby chic! Of course, I don't have a before photo. I am getting better though...I took a bunch of photos today of projects I haven't yet started.


I chalk painted these white and waxed them with clear followed by black wax all over, but especially in all of the nooks and crannies, to really make those details pop!
Aren't they awesome?


These have a really nice weight to them too! Here the are up close:


Wow, wow, wow!


They are available in our Champagne Shabby Etsy shop. I have a feeling they won't be there for long though!
I will definitely be on the look-out for more of these. It's the simple decor items, I think, that can really transform a space. I plan to do something with the books too. Stay tuned...

See you again soon. I'll be continuing to feature "the smalls". I am motivated to get these all done and then move on to some other larger pieces I have. I've got a bunch that are "in progress" so I'll be sharing those with you too. Take good care in the meantime!

Nested box makeover

Hi there! I hope you are having a fabulous Saturday. I wanted to share a little project with you today.

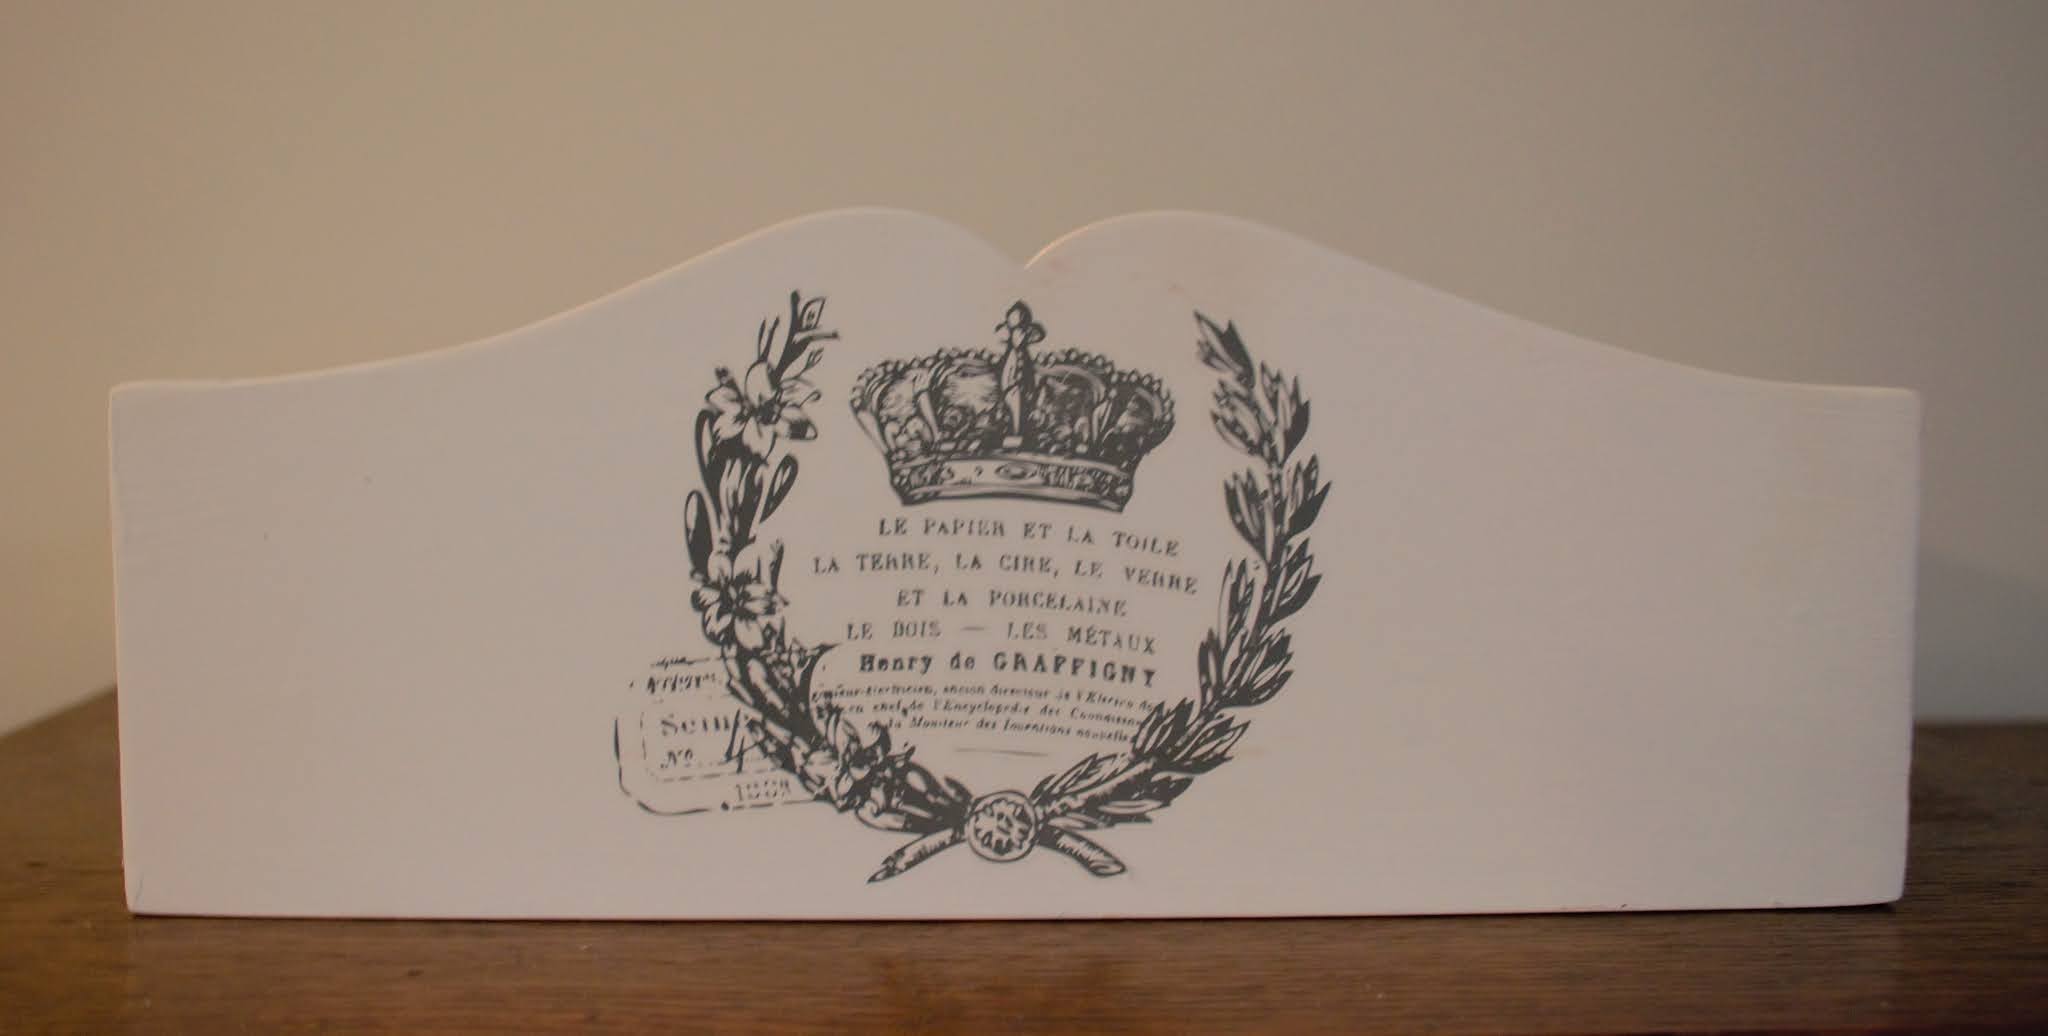
I upcycled these nested wooden boxes a while ago but have finally gotten around to posting them. I found these at my local thrift store where I get all kinds of treasures. These initially had a floral print on them and they were a dirty ivory colour (not to mention they were really grungy/dirty when I got them!).

I gave them a few coats of white chalk paint and and added an Iron Orchid Designs transfer. This tube has a lot of transfers so you really get your money's worth. I don't get any kind of compensation for saying that. I just really love the product.


I like these a lot. I'm tempted to keep them for myself and put them on my porch with some petty purple flowers for a nice pop of colour. Hmm. Nope - they are going in the Etsy shop.

I really need to learn to take better photos. These are nice and bright in real life. I guess it doesn't help that it has been gray outside for the last while.


I'd love to find a few more of these and try a different colour but I'm happy with them.

Have a great weekend everyone!


December 30, 2020

Waterfall Dresser Revamp

 Hi everybody! It seems like ages since we posted last. Well, it has, really. It's been a pretty busy few months personally so it hasn't left much time for refinishing and upcycling projects but I have a beautiful little waterfall dresser to share with you.

As usual, I forgot to take a "before" photo (I really must start keeping a camera by me when I go in my painting room) but I'll tell you, it needed some much needed updating. I don't know about you, but I make a little "squeal" sound when I opened the drawers to find a bunch of interesting things in there! Nothing valuable, but there was a handwritten note thanking the previous owner for a gift, 3 gold Christmas baubles (which found there way on a garland spray I made for a friend) and some loose papers.


Here is the finished dresser. Let me back up a bit though. I started by sanding the whole dresser to take off the finish and bring it back to the bare wood. It was mostly in good shape and only needed a little bit of filler in a couple of spots.


The next step was to stain the whole piece. I used Minwax Chestnut Gel Stain and gave it two coats. It's a nice medium brown colour. This goes on so nicely and is a breeze to wipe off. 

I then applied the transfer. This is from Prima Re-Design and is called Precious Collection. I will admit that I messed it up a little and so part of it had to be removed. 

Fortunately, it was only a little and I don't think you can tell. It would have brought the transfer down a little but wouldn't have reached the bottom of the 3rd drawer anyway. I don't think it really matters.


I'll be selling this lovely dresser in our Etsy shop. If you are local, porch pick-up is available.

I've been busy painting over the holidays and will post a few items over the next couple of days.

Here's to a Happy and Healthy New Year!  All the best to you and yours. 

Donna