September 24, 2020

5 Easy Steps to Prepare your Home for Fall


It's officially Fall, though we were surprised by autumnal weather over the last couple of weeks. With the thermometer showing cooler temperatures, our thoughts move from beach style decor to one simple word - Cozy.

Just as we now pull on the warm socks we stowed away in the spring while slipping on sandals and tees for the past few months, it’s now time to put on your home’s warm socks and sweaters. Not quite so fast, though! Let’s do this in a simple, step by step way that guarantees you a stress-free seasonal transition, and less work, so you can do the fun fall things you and your family love.

Why is a step-by-step method needed? Because it’s not just a case of plunking your plastic containerful of turkey-themed whimsy on all your home’s surfaces. You want calm, not crowded. Let’s start:

#1 Editing. It’s always about editing. In each room, gather up the lovely summery accessories you’ve been enjoying while it’s been hot. Give them a clean - perhaps just a wipe with a damp cloth then a buff, wrap them up and put them all in one place. You’ll gather everything up after your fall container is empty, wipe it out if needed, then store away summer for another year.

#2 Cleaning. I’m not endearing myself to you, am I? I know, but over the summer, with the patio doors opening and shutting almost constantly, spiders and their friends may have made themselves comfortable inside, and it’s incredible how much of the outside ends up inside. 

Dust top to bottom in each room, evaluate if surfaces need more interventions by jotting down notes on each room (chipped paint on the windowsill, clean the far wall where there are liquid spill marks etc.), clean soft surfaces - with an old cat, slip overs are a lifesaver - and finish by deep cleaning your floor.

#3 Editing. Wait - I already said that. True, but after moving all the nick knacks off the tables and shelves to clean, look at them all again to see if they might work better in another spot, another room, or another house. Have an Out the Door box along with a Possibly Out the Door box. Divide the first into Donate and Trash, and the second can be stored for a season if you’re just not sure yet.

#4 Inspiration. I don’t normally see this on similar lists, but one of my favourite things to do, is to flip through magazines, Pinterest, IG and store displays (this year
online) to see what looks are fresh for the season. I might pick a colour that keeps coming up or a theme I like as a starting point. I’ll then look at what I have and what I can easily add to make things feel fun for Fall.


#5. Decorating. Finally! I challenge you to put out only your absolutely favourite items, and consider if they might look great in a new location, in a new way. Did you see any design trends that might have you grouping your faves in a space you’d not thought of? Try it! Maybe move a couple of pieces of furniture around while you’re at it. Start with bases - piles of books, tables, shelves, mantles, and work your way up. 

The last step is truly the coziest part - bringing out your throws and lap quilts (you DO have lap quilts, don’t you? This quilter has enough to keep everyone toasty). Drape them behind cushions on your couch, over the backs of chairs, rolled up in wicker baskets, pulled from your cedar chest, and settle in with a cup of something warm and delicious to reward yourself for your work and creativity.

September 13, 2020

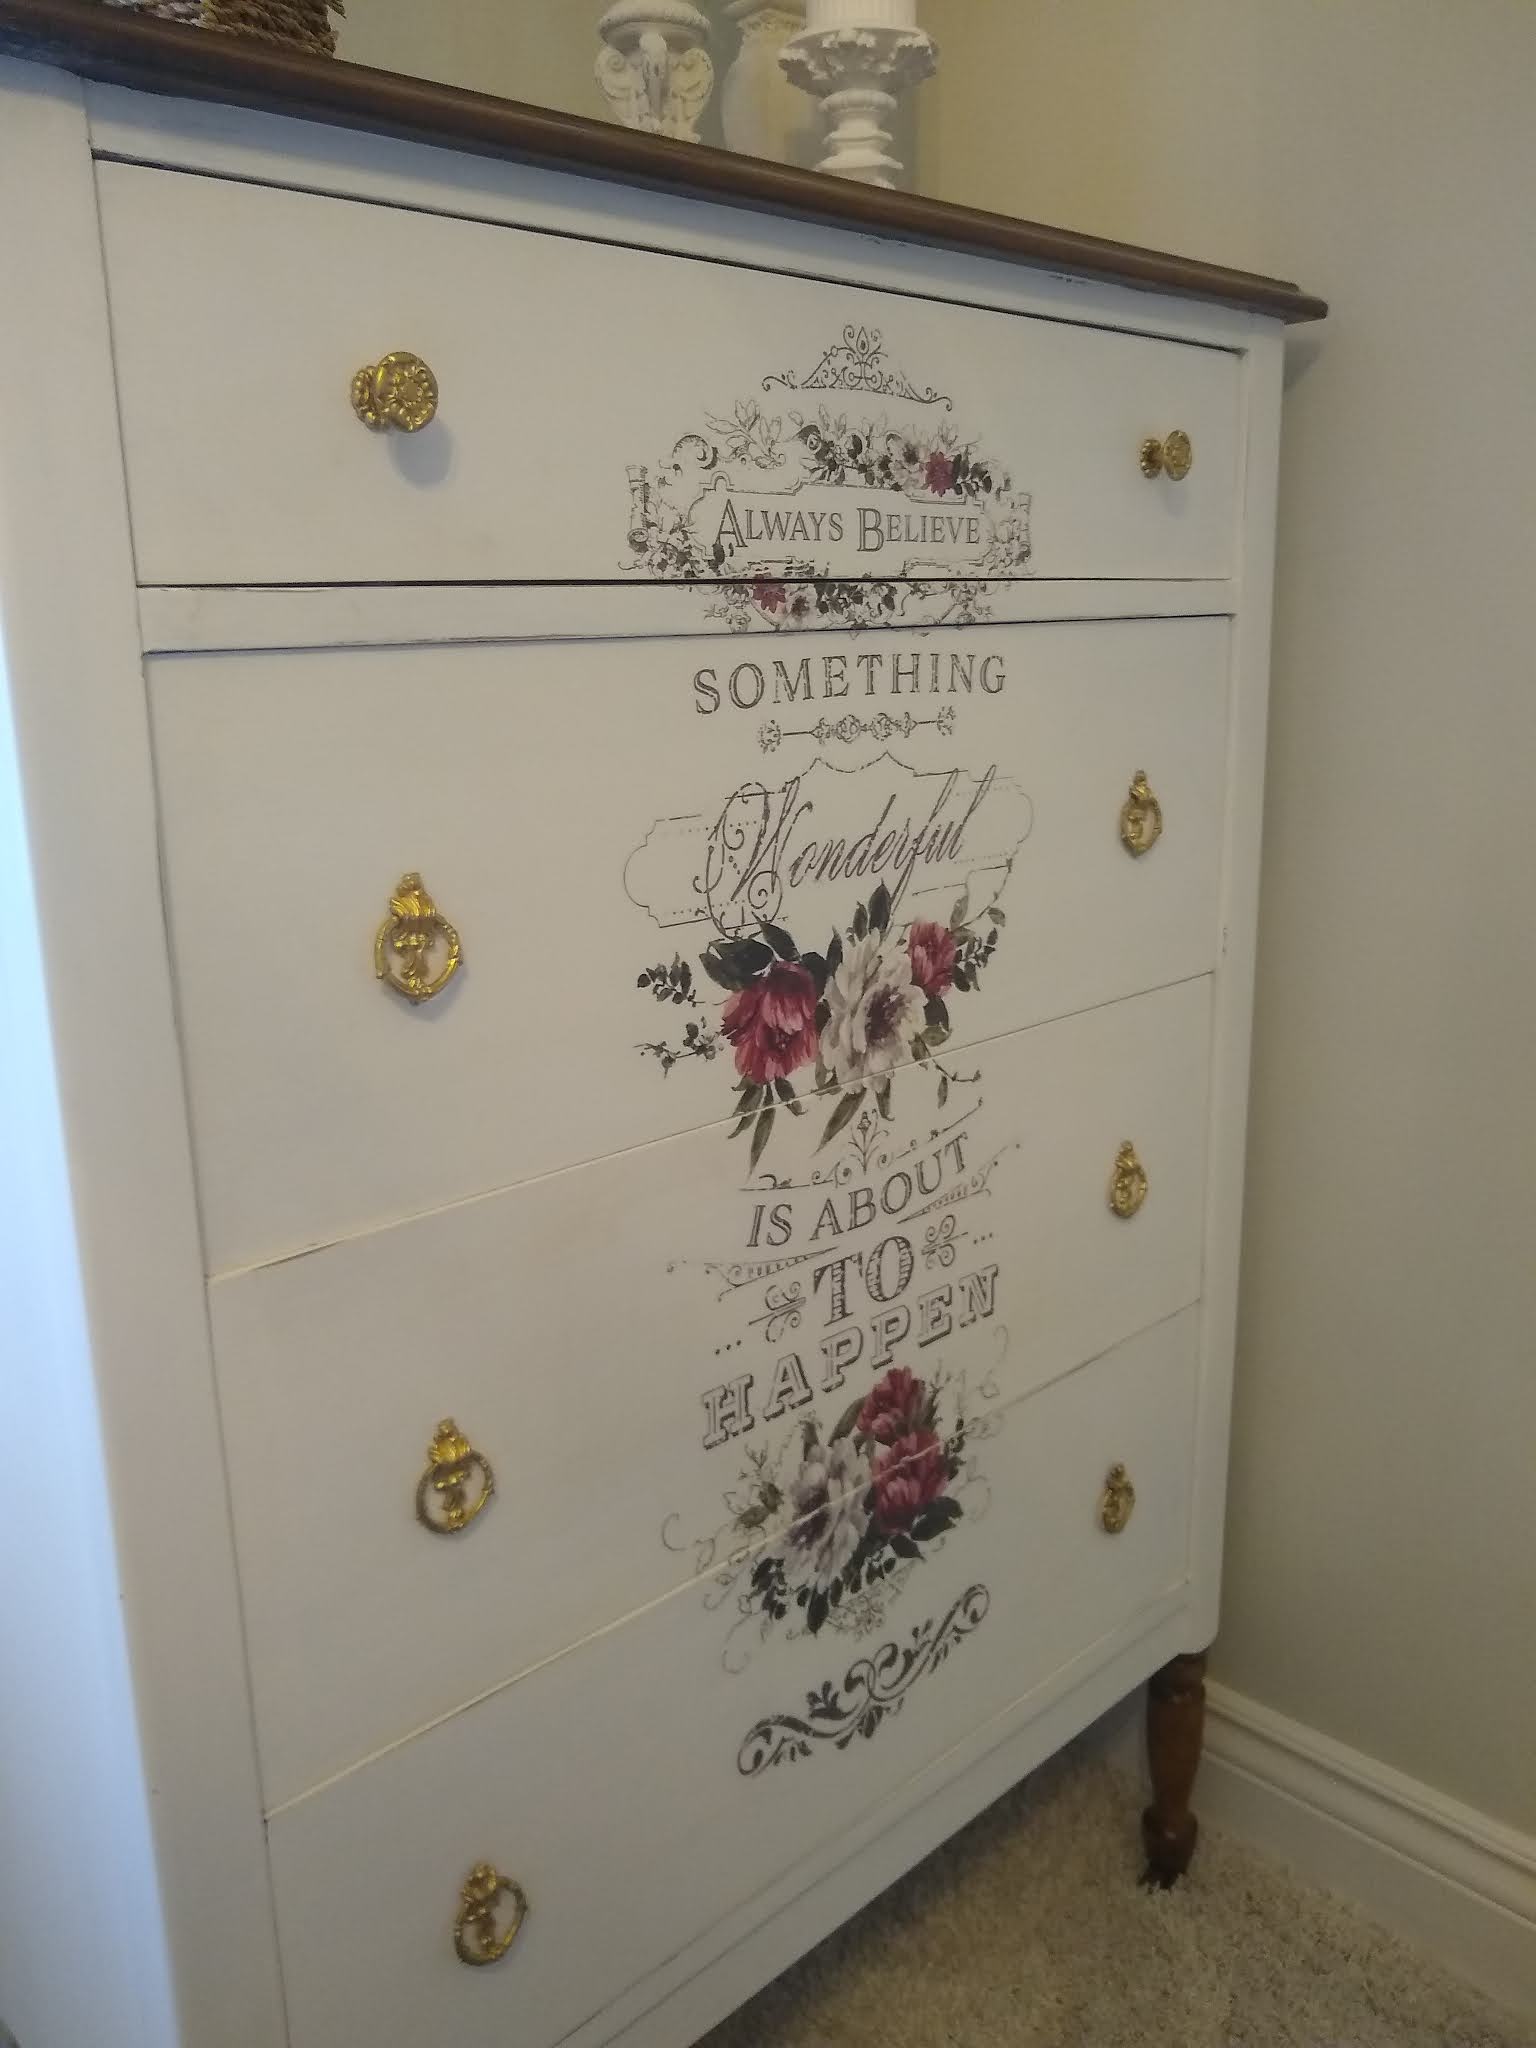
Something Beautiful Is About To Happen!

I was fortunate to win this dresser in an auction for a really great price. In the rush to get other items for our booth at the Hamilton Antique Mall, this beauty was put on the back burner. It was covered with a tarp on my front porch. I was finally able to work on this last weekend and did some final touch ups today. I sanded the whole piece down with 220 grit paper and painted it with my homemade chalk paint (I think it got 3 or 5 coats). I didn't give it an initial coat of BIN shellac primer because it wasn't a dark wood & I didn't think there would be any bleed-through. 

I'll retake the photos because the only place I could take them right now was in a bedroom right beside a window and they are not good at all! I was just so excited to show you all that I had to post it anyway! #hamiltonantiquemall


I used Minwax Gel Stain in Chestnut on the top and the front legs.


I used 
Prima ReDesign Hopeful Wishes to make this beautiful piece even more stunning.


 I gave the chalk painted areas a little sanding to slightly distress it. I added a coat of white wax on top of that and some polyurethane on the wood to seal it all.

It is available to purchase. Please send a message if you are interested in it. 

September 02, 2020

Thrifty Find

 Honestly, you never know what you will find at a thrift store on a given day. Since I have had a few months of "free time", I've been thrifting wherever I find myself. This little beauty came from Kitchener, ON when I was having a "girl's day" with a friend to celebrate our birthdays in August. I got a pedicure and she got lunch. Fair trade, if you ask me. Since my friend was the driver, I was thrilled when she agreed to shuttle me to a local thrift store. I think I've passed "the bug" along (no, not the coronovirus - we wear masks ALL the time) - "the thrifting bug". All this little lady needed was a couple of coats of Flat Black Tremclad Rust paint, which we happened to have at the house. She'll be in booth 01 C tomorrow at the Hamilton Antique Mall.


We're constantly working on painting projects and upcycled goodies. We'll be posting weekly so stay tuned!

August 27, 2020

 I am loving having a booth at the Hamilton Antique Mall. Every day, I wonder how many people pass by. I would love to know what is going through each person's mind when they wander through and see our products for sale. Do they see where they could put the offerings in their own homes? I know when I see things I love, I ask myself, "where does this belong in my life"? 

I am always thinking about the next stage in my life and where I want to be and what I want to have in my home, garden and community. For my husband and I, our next move is related to our retirement. I see my new home with mostly repurposed and handmade furniture. We'll be living in a VERY rural area, so I'll want to up-cycle as much as possible. I see things like what are in our booth to put in our home to enjoy for many, many years to come. Here is one example of things I love. The hutch on the bottom is a perfect coffee bar station that I can put pretty much anywhere - a guest room, a games room or an office. The small end table can go in the living room, a bedroom or basement TV room. We really strive to ensure our products can serve multiple purposes in a home. 


I can see everything here in more than one room our a home. How about you?


August 24, 2020

Vintage Cedar Chest Makeover

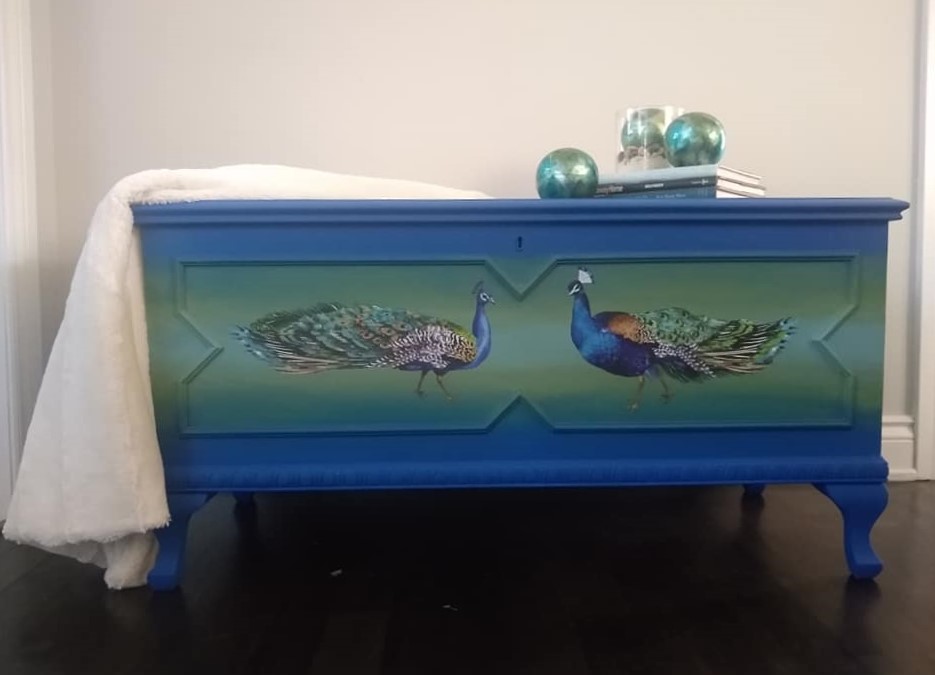
I am so happy with the way this cedar chest makeover turned out. I used a number of chalk and mineral paint colours (Dixie Belle Cobalt Blue and Kudzu, as well as Annie Sloan Provence and blended them. I have to be honest, I was really worried about how bold these colours were and how they would blend together. I have never done a project this "out there" before. I chose the colours based on the peacock transfer from Prima Re-design. I had a heck of a time finding the perfect transfer to use so this sat in my hubby's work shop (aka the garage) for a while. 


Here is the chest open. It has a lovely additional box on the left side for smaller items. 

This photo and the next one are the sides of the chest and I decided to add a smaller peacock beneath the handles. The quality of these photos isn't the greatest - sorry about that!


I really tried to capture the vibrant peacocks so decided to have the lightest colours in the centre. I took a risk with the cobalt blue on the top and bottom of the chest. All of the You Tube videos I watched started with one colour at the top and ended with a different colour on the bottom. 


Here is the whole chest. I sealed it with Annie Sloan Clear Wax.

When I picked up the chest, it was locked and I was told there was no key. There was something inside but I initially couldn't open it. I had a feeling that MDH (My Dearest Husband) would be able to MacGyver this open for me.  He did and guess what was inside? Yup, you guessed it, the KEY! I have noticed that most vintage cedar chests don't have a key any longer. 

Here is the before:


I'd love to know what you think of this. I love it, but I could be a little biased. 

August 23, 2020

Such Exciting Times for Champagne Shabby!

We may have been quiet as mice, but we've never stopped playing with our paints.  In fact, we decided at the beginning of the month to take a booth at the Hamilton Antique Mall!  We're so happy to be able to share our goodies with you in one place, so be sure to visit us on the Lower Level, Booth 01C.  


We're just thrilled with the response, and have been back to restock a few times now with pretty pieces we're really proud of.  We want to bring to you beautiful handcrafted and repurposed home decor items to enhance your home.  Let us know what you’re looking for so we can be sure to keep our eyes out.

Donna and Veronica


January 11, 2015

New Year, New Plans

What the heck happened?  It was the beginning of December and...poof!  It's the beginning of January!  The good news is, it was a whirlwind of fun and family for all of us.  The Champagne Shabby girls spent quality time together celebrating the season and enjoying each other's excellent cooking. I don't have any incriminating photos, however. There may be some New Year's photos, but I haven't seen them yet. What can I show you, then?  

Well, I'll go with a couple of shots of my decorations as I packed them back up. Some are my grandmother's and others I've found when antiquing.  Their faded beauty is right in keeping with our love of charming house goodies. We have lots of ideas for sharing that love for this New Year!


December 04, 2014

Dollar Store Christmas Decor

Red berries. I just love red berries. In the summer, they're in the form of raspberries in the garden, and in winter, they're wreaths. Two big ones on my doors and now in my front hallway. Pretty and pretty simple.

Here are the instructions: 1. Clear off your front hallway table. In my case, a beautiful dry sink my parents bought many years ago at auction. You can read about those childhood auctions here. 2. While at the dollar store buying plastic plates and glasses for your company Christmas lunch, grab up a bunch of the great little berry wreaths you come across. 3. Pile the little wreaths in an incredibly cool vintage turkey feeder (a turkey feeder!) from a farmer or from Oliver and Rust's October Show, which was so much fun.

And yes, it's that easy!

November 28, 2014

Vintage Christmasware

Get ready for it. This is the weekend that Christmas gets sprinkled all over the house for many people. I don't redo Christmas decorations every year or even every couple of years, unlike the sister of a certain business partner. ( let's see if she reads this. If I'm uninvited to the Christmas party, then I'll know!). For years, I've put out the same things in the same places, but last year I cut way back. No really, I did. I'll bet the guys didn't think so, or notice I showed incredible restraint.

 That doesn't mean I won't pick up something great when I see it, like this cool retro candy dish from the incredibly cool store Monastiriki in MontrĂ©al. Seriously, how could I NOT buy it! I can just see those little melty, minty pastel pillows on my grandmother's coffee table, just waiting for grandchildren. This little piece will fit perfectly with my antique furniture and quilts. I love this one too much to sell, but we'll be gathering up some great finds  for the etsy shop for you!

November 23, 2014

A Champagne Shabby garden tale

The garden is put to bed for another year. Not as well as I'd like, with compost and manure spread around to break down over the winter, but it'll have to do. I have flowers, but my favourite gardening is vegetable gardening. I love bringing in food from my own garden for dinner. Today, I pulled out the leeks, which are on the left, and the last of the green onions. 

I especially love what I call grocery store gardening. I don't grow everything from seed, like I did the leeks.  Some things, I grow from other things. Take the green onions you see in the sink as a super simple example. When you chop off the top, you're chopping off roots, right?  Well, take them back out to the garden, make a hole with your finger and pop the roots into the ground. 
See that's little brown knob?  That's the root from the original green onion. All it takes is time and water. They're so slim ( ok, maybe not this guy) you can put them anywhere in your garden, including shadier spots. 

I've trimmed the onions and when I trim the leeks down, all the greens will go in my plastic freezer bag which right now holds some chicken bones. I'll thaw them and other good scraps another day, for soup or risotto stock. 

What on earth does this have to do with Champagne Shabby?  Well, all three of us hate waste and are looking to use more of what is already out there.  This is just another example of the Champagne Shabby lifestyle. Not cheap - resourceful. What do you think?